January 2019 – RV Upgrades, Modifications, Improvements, and fixes…
With the start of 2019 and before our departure from Florida we had several maintenance, service items, and upgrades to complete… (This is an understatement once you see this list…)
Drivability/Handling:
Since buying our 2017 Newmar Baystar I have been on a mission to improve the handling and drivability of our Coach. Gas Rv’s, on the Ford F53 Chassis, have been notorious for years for poor handling issues. Just google it and you’ll find a myriad of forums, suggestions, opinions, and frustrations regarding this issue.
From the very first time behind the wheel, with our drive back to the Northeast after taking delivery of our vehicle at Newmar in Nappanee, IN, I have been on a quest to make this situation better. I would be hard pressed not to say, ” that an RV on a F53 Chassis on a short wheelbase/32′ Motorhome remains a never ending white knuckle experience.”
Note: since we have a 2017 model we already have the upgraded 6 speed transmission, 22.5 tires, and a 22,000 lb chassis which all, I’m sure, helps though certainly no-where’s near enough.
Starting at level “0” on a 1-10 scale of handling/drivability what would it take to make this RV more pleasurable to drive. After considerable due diligence and research it actually just came down to how much are you willing to invest…
I have watched Youtube videos, read countless blogs and internet forum postings, talked to Henderson’s Line-up, Talked to Redlands Truck, Talked to E-Trailer, and had the coach looked at by several shops for recommendations and suggestions
Here is a list of modifications/upgrades that we have added – (with the final ones made this January ( in bold):
March 2017 – Safety-Plus installed (Centering Shock absorber which helps with tire blow-outs and autocorrecting your steering to true center)
April 2018 – Trac Bar, Roadmaster Heavy Duty front and Rear Sway Bars
January 2019 – Front & Rear Sumo Springs (Installed by Don’s Diesel)
January 2019 – Koni FSD Front & Rear Shocks (Replacing the hard riding Factory Bilsteins)
With the Drivability/handling upgrades (MAJOR -BIG-IMPROVEMENT) now complete the next items I scheduled were centered around the roof and power upgrades.

Sumo’s

Sumo’s
New Roof:
Driving South during early October, it was during our crossing through the Virginia Mountains we were met head-on by “Hurricane Michael…” Between the wind, horizontal rain, constant weather alerts for flash flooding and tornadoes, coupled with nearly zero visibility we definitely experienced a little too much adventure that day. The drive of Thursday October 11, 2018 will not be something we will ever forget and definitely won’t ever attempt again before getting as much clarity as possible on weather patterns/predictions. The resolution we made after that day, for future driving days, emphasizes the importance of being very prudent when it comes to weather and driving conditions each day. Hunkering down somewhere safe in the future, in like circumstances, will with-out question be the more advisable decision. On top of that, Joanne laid down the law about ever pushing through again like that as it was just way too stressful.
While we survived the drive and storms we did incur some damage from the wrath of “Hurricane Michael”. Upon waking the next morning we discovered our bedroom ceiling had incurred water damage underneath where our back AC unit is. Not sure how the water got in though we had received over 10″ of rain that day (mostly horizontal), and very high winds for nearly 12 hours. Resulting problem: the ceiling in our bedroom area had a leak and left a large water stain.
I don’t know about you, though things like this just drive me nuts…After repeated conversations with Newmar I decided to take our unit in for inspection at EliteRV in Palmetto Florida. The inspection came back with several potential points of entry including the AC anchor bolts, which were never sealed on installation and the AC compression gasket had been over tightened. They also pointed out that Newmar doesn’t top seal the nearly 200 sheet metal screws that anchor the sheet metal that circumvents the entire roof of the coach. (Newmar confirmed this is common practice which Elite RV found hard to believe.
With the problem very visible inside the coach, I decided that I didn’t ever want to experience a problem like this again. After the ceiling panel was repaired and the cosmetic issue had been addressed I decided to have EliteRV install the Lifetime Guaranteed RVroof.com spray-on roof system. Those of you that haven’t seen this system can read all about it here. The product is applied only by a few select applicators in the country and is literally bulletproof. They remove every item on the roof, during the prep process, which is very extensive and takes about 2.5 days before spraying the entire roof with their pure polyurea product.
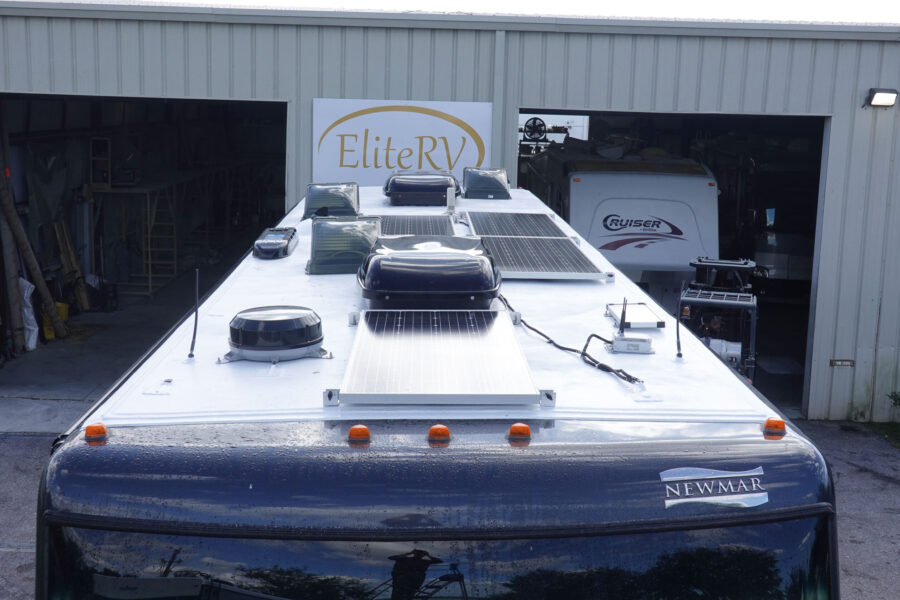
The roof prep and removal included: the 3 Fantastic fans, (2) AC/Heat Pump units, Winegard Antennae, Wi-Fi Ranger, Weboost Cell Booster, Refrigerator vent and other vents, and every piece of caulking on the roof. After the extensive prep they then taped off the entire coach to protect it for the roof application process. The spray literally dries in 6 seconds, when applied, and is then painted with a special product that leaves the roof bright white when completed. With the new roof cured/dried they then complete the install by reassembling all your roof top equipment. A few items we opt with ed for with the new roof install included: spraying the skylight with the product and then having an LED light installed in the roof of the shower, wired to the bathroom switch. This set-up will replace the ambient light lost to the spraying over the of skylight. The other option was we installed 2 new winged vent pipe covers.
Once the reassembly and roof is completed RVRoof.com/EliteRV gives you a written lifetime guarantee that your roof will never leak again which they will honor to you and is transferable to a new owner. The product is undeniably top shelf and the guarantee and result produces absolutely piece of mind that you won’t have another future roof problem. (and if you do they will fix it!)
With the roof completely sealed the only challenge remaining is if you ever want to add any additional products/upgrades you will need to return to the RVRoof applicator (in my case EliteRV) and have the new devices sealed back into the roof making it guaranteed again.
Because of this situation I decided to have my RV solar system installed by EliteRV as well prior to having the roof sprayed.
Roof Problem from Hurricane Michael…

Roof Problem

Roof Problem

Picture of the roof Top Before…
Solar:
My goal from the time we bought our unit was to install a solar system on the roof for boon-docking. We have been using a Zamp 160 watt Zamp Potable panel for the last 2 summers during our Camp Hosting at Assategue with excellent results. While the portable works well we really were looking to enhance our solar collection efforts and storage capabilities as time progressed. Having the roof scheduled to be installed really forced our hand to install a roof top solar system before installing the RVRoof.com product. After considerable research and with help from JR at www.offthegridrvs.com I decided to install (4) – 180 watt panels on the roof along with the optional tilt brackets and a Victron MPPT 50 amp controller. This required some logistics on my part including considerable project management and coordination with www.offthegridrvs.com, EliteRV’s (Roof team & Technical team), and Newmar. EliteRV was very professional and worked with me at every step in recommending and thinking through panel placement for optimization, solar controller set-up/install, bus blocks in the battery compartment, circuit breakers before and after the controller, set-up of the blue-tooth application for monitoring remotely, and integration into the shunt and Trimetric panel meter already installed.
Here is the list of parts purchased from www.offthegridrvs.com:
(180 watt)Tilt Mounts Panel mounts w/tilt arms – 4
BS-60038 Blue Sea 600 amp bus bar -2
7183-bss Blue Sea 50 amp Breaker -1
7184-bss Blue Sea 60 Amp Breaker -1
VE-SS-100/50 Victron SmartSolar 100/50 -1
J Block 4 panel J-Block w/3M -1
10/2-MRMX 10/2 Marine Romex -50
MC4-MF MC4 Connectors -8
WIR-2 2 gauge Black/Red w/lugs- 1
Elite RV Pictures: (RVRoof install & Solar Install)

Elite RV

The Prep area…

Working on the Install..

Elite RV working on the install…

Working on the Install…

Front of Coach…

Rear of the new RVRoof…

Solar Testing…

Programming the Bluetooth Solar Controller
Service Items/Punch List:
Bird charging control/Relay issue:
While driving in September we started to notice the coach batteries were not charging while we were driving. Through some diagnostics EliteRv determined we had a faulty relay from the Bird Controller. Voltage was going into the system though no voltage was getting through it to the batteries. After replacing the relay the charging problem was solved.

Elite RV fixing the BIRD Relay Charging Circuit…
Bedroom Slide Controller:
For several months we had discovered the bedroom slide controller was working intermittently. After several very frustrating situations Newmar decided to replace the controller at no charge.. While their isn’t a formal recall Newmar has recognized the issue and sent a new unit and allowed and hour of service time to have it installed. The only caveat we discovered is the new controller is wired the exact opposite from the original and it appears it now works backwards from the label on the original. After some wasted time with the tech I called Newmar and they said they are aware of the issue and the fix was to take the label off the switch and just flip it so the instructions now read correct. A simple fix though they should have made us aware of it before wasting all that time.
Refrigerator Panel Paint issue:
While at Assateague this past summer we had discovered our refrigerator panel was beginning to rust by the (4) screws that hold the panel in place. We found this problem very strange and see that the problem is getting worse quickly. After showing it to the ElitRV paint department they felt the screw holes were not sealed correctly and moisture had gotten in behind the cover and screw holes. We talked to Newmar about it and after much discussion they decided to go 1/2’s with me on fixing it by sanding the panel down to bare metal and sealing/repainting. Thanks to EliteRV’s paint department!
Mini/Tow Car Service:
Before Leaving the Bradenton, FL area we decided to have the Mini serviced. Service included: an oil change, new brakes/rotors, (2) new rear tires, and service to address a check engine light. The work was done at German Cars of Sarasota. It wasn’t cheap, though it was necessary, and they did a super job.
Tow Car Brake system:
We had a custom hitch created by Dan’s Hitch in Elkhart, IN to tow our Mini Cooper after picking up our RV back in July 2016. With the Mini Cooper being a very light tow car we had decided not to put in a supplemental brake system at the time. After we started Full-timing and traveling more and with plans to spend considerable time driving across country and then to Alaska and the Yukon Territory this summer, we felt it was a prudent decision to add a supplemental braking system.
Looking for the easiest and best system we could find we settled on the Demco’s Air Force One/Stay-N-Play system. We made an appointment in Tallahassee, FL before heading West at Capital Hitch. Capital Hitch allowed us to park in their parking lot the night before our appointment so we were there at 8:00am for them to get the keys and begin work for the install. The install we thought would only take a few hours, though turned out to be an all day event.
I know this list is hard to believe and I can’t believe I got all this does in less than 2 weeks. Was it expensive, yes, was everything a must (probably not), did time, convenience, and vendors play a role in getting it all done now (yes), are we appreciative/lucky the Esteves allowed us to stay with them while our traveling home was being serviced (absolutely), was it a big decision/investment (incredibly so).
Some days Joanne must think I’m nuts though all this work will enable us to be safer, more prepared, better equipped, and ready to take on the 2019 Full-time RV Revolutionary Journey….
The finished product…

The finished Product…
Ready now to head West on our Revolutionary Journey…

